
I don't know about you, but I just love all the Coral and Shell decor that I've seen in all the catalogs lately!
The minute I saw this one in Pottery Barns catalog, I knew I wanted to try to make one.

Pottery Barn
I love the texture, the color and the small mitered flange that outlines it like a picture frame.
I had to think about it for a few days to come up with how I wanted to add the texture to my pillow. Then I came across this fabric at JoAnns in the clearance section.
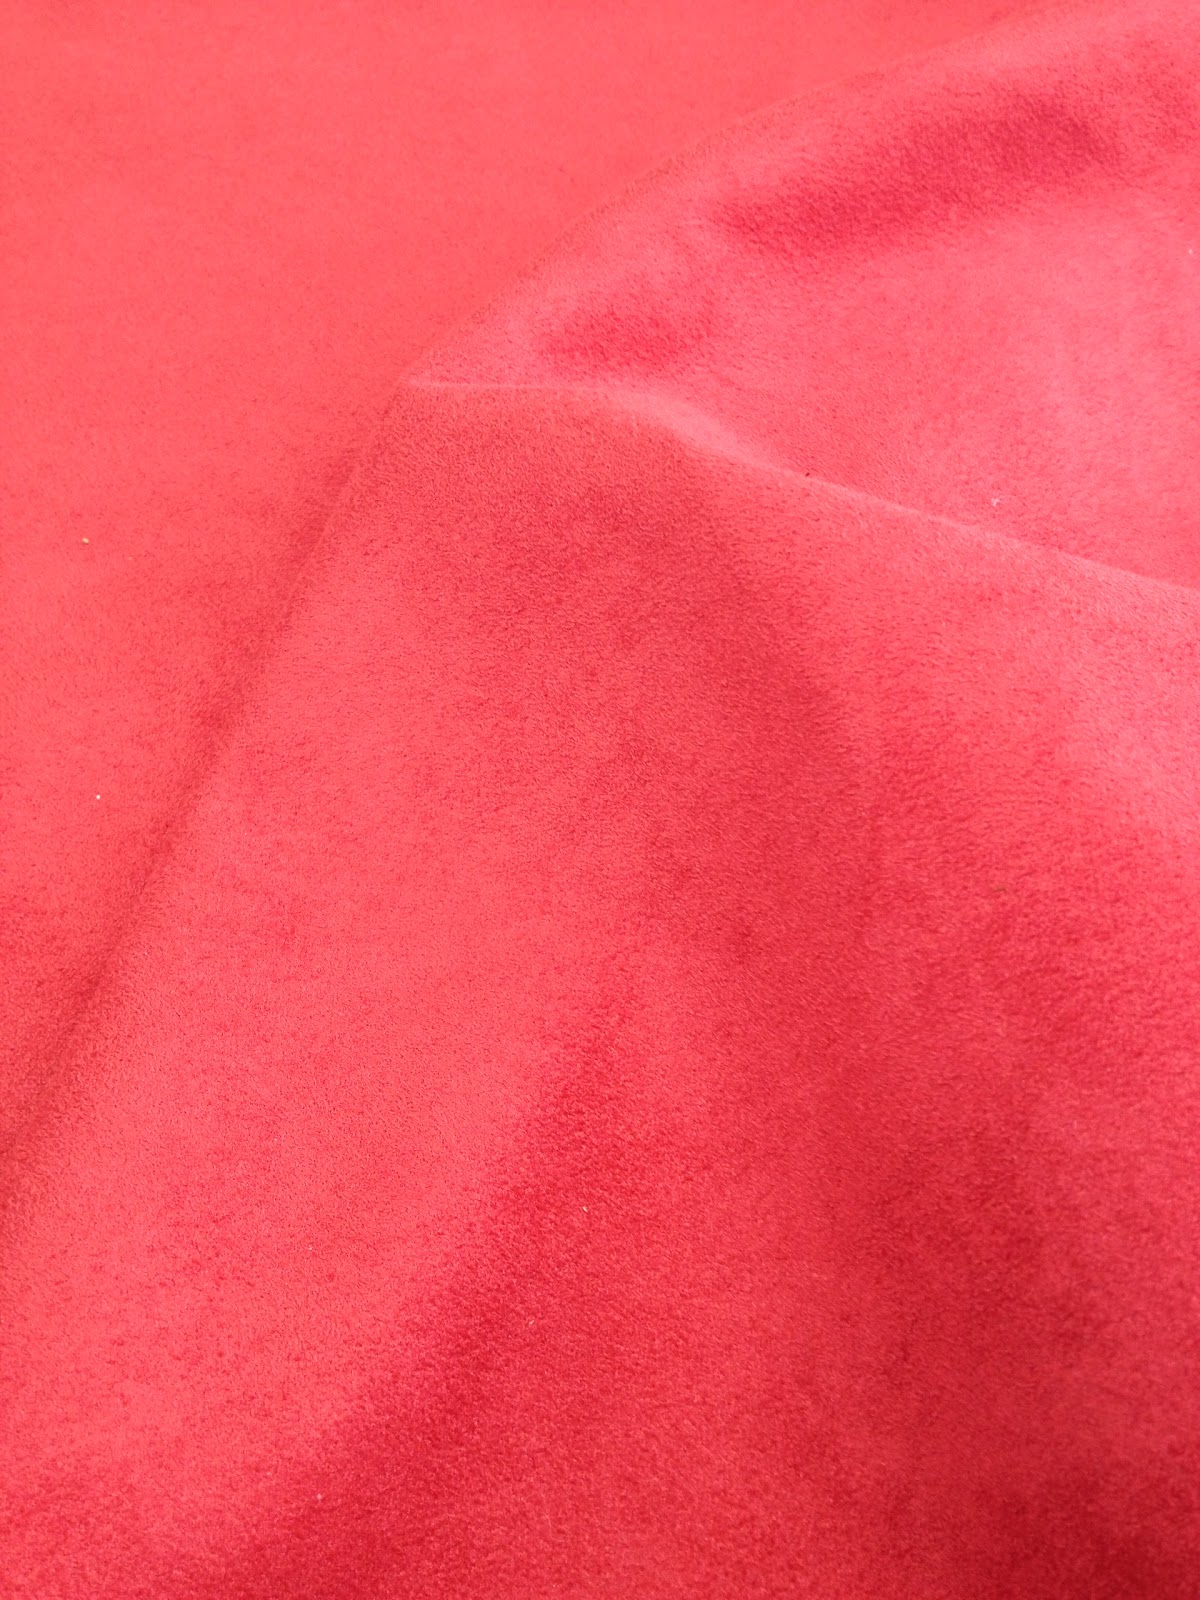
It's a micro fiber suede. It was on clearance for $9.00 a yard and I had a 40% off coupon. Doesn't get better than that!
My drawing skills are pretty good, but my 15 year old sons are even better! I used a large piece of paper and drew a large square the size I wanted my pillow to finish at...20". I showed my son the picture of the pillow in Pottery Barn's catalog and asked if he could draw me some coral like that. He divided my 20" square into 4 squares to help him get the scale right. It took him about an hour and this is how it turned out.

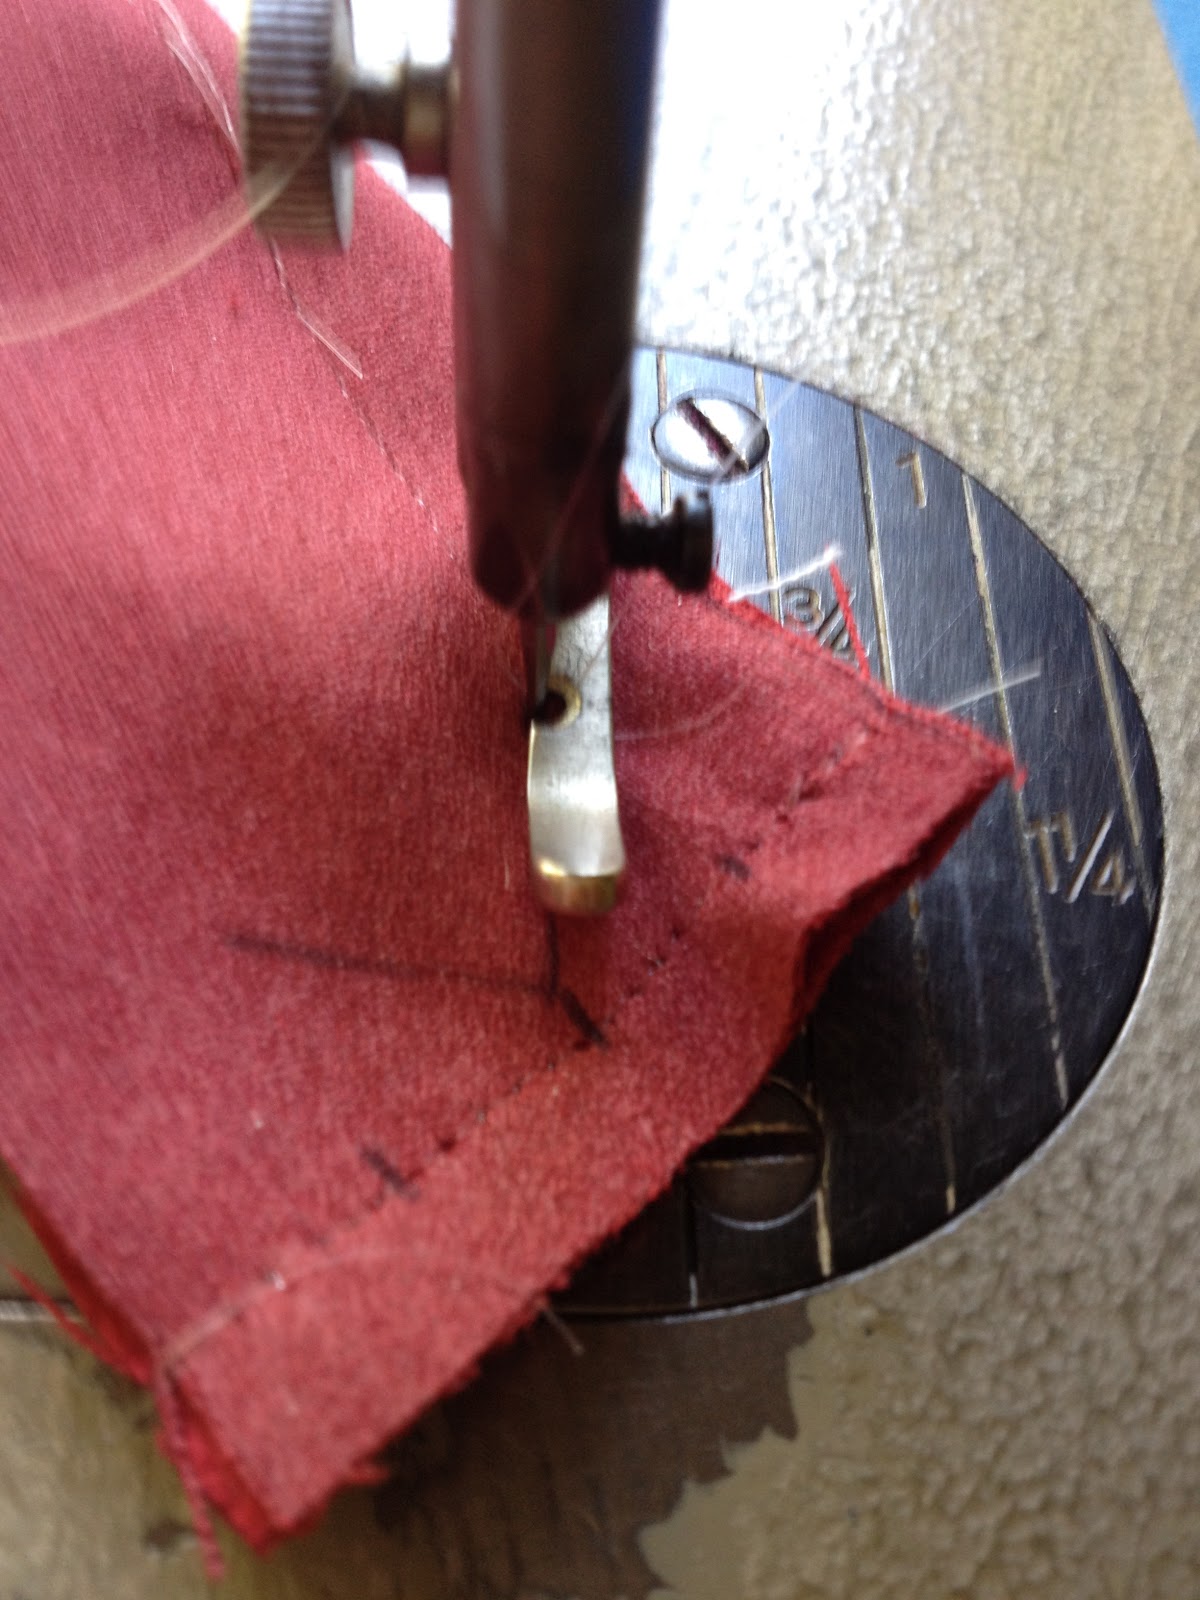
I knew the micro fiber suede would not fray too much and so I decided to use an iron on adhesive. As you can see, I got this one at my local thrift store for a whole .25 cents.

The HeatnBond is see through enough that I was able to lay it on top of the drawing my son made and trace the coral shapes onto the paper side of the HeatnBond.
Following the manufacturers directions I ironed the HeatnBond onto the back side of my fabric.

After cutting out all the coral shapes with a sharp pair of scissors I peeled off the paper backing.

Using the original drawing my son made, I carefully placed all the coral pieces on a piece of off white fabric that I cut 21x21 inches square. I used a few pins here and there to keep it from shifting as I ironed it to the pillow fabric.

Once the coral was set on the front of my pillow fabric I finished constructing the pillow like this:
So as I already said, I cut my pillow front 1" bigger than the finished size (20"), I cut it 21x21". But since we're adding a 1/2 inch mitered flange to frame out the pillow, we can not do the zipper at the very bottom of the pillow. The zipper will land slightly above the mitered flange at the bottom of the back of the pillow. Cut your back 21x21" (the same size as the front) Then cut another piece 21x2".
You can use a store bought zipper, but I always use zipper by the yard, so my instructions will be using zipper by the yard. And since I'm using zipper by the yard, I will need 2 zipper stops. I make them out of fabric so I'm never stitching across the zipper teeth with my sewing machine needle (which will dull the needle)
My zipper stops are about 2 1/2" long by about 1" wide.
Here's what my zipper components look like:

Fold under 1/2" on one of the zipper stop and lay it on your zipper end by 1/2". Stitch right next to both sides of the zipper teeth.

Leave the other end of the zipper free for now.
Place the long edge of the small back piece right side down on the zipper aligning it with the edge of the zipper tape.

Stitch close to the zipper teeth. Pause 3-4 inches from the end. Fold under 1/2" on remaining zipper stop and line it's raw edge up with the pillow end. Cut the zipper off allowing 1/2" to go past folded end of zipper stop.

Slip the zipper stop under the pillow back piece against zipper and finish stitching to the end. When you open it up, it should look like this.

Add your zipper slide to the zipper.


Now once you have your slide on your zipper, slide it down to the center of the zipper.
Place the other back pillow piece along the other side aligning it with the zipper tape. Stitch close to the zipper teeth.

Lay it out flat right side up and then fold the fabric over the teeth of the zipper to form an overlapped zipper. Your fold should just go slightly beyond the zipper teeth, just enough to cover the zipper teeth.


Line the right side of your zipper foot up with the left side of the zipper teeth and stitch.

With wrong sides together, lay your pillow front on top of your pillow back, lining up the edges. The top edge on your back piece may be a little bigger. Trim the excess off.
Cut 2" wide strips of your coral fabric to use as the mitered flange frame. I cut 2 of these the width of my fabric x 2".
Lay one strip face down on the front of your pillow extending the strip past the starting pillow edge. Start stitching 1/2" from the beginning corner using a 1/2" seam allowance.

Stitch to the end stopping 1/2" from the corner. Back stitch and remove from the machine.

Using a clear ruler, make small marks on the strip at 1/2", 1", and 1 1/2".

Hopefully your clear ruler has 45 degree angles on it. Line the 45 degree angle up with the long edge of your strip and draw a line to the 1" mark on your strip. The line you see going across my strip is not the 45 degree line, it is the 30 degree angel line. ( Didn't want you to get confused on where to line up that line)


Fold the strip slightly beyond the point of the "V" and pin. Notice my lines do not go all the way to the edge of the strips. Pin. Stitch through both layers following the "V" and not stitching beyond it.

Turn the corner of your pillow and starting right where the stitching of the "V" ended, stitch the strip to your second edge of the pillow.

Again, stop your stitching a 1/2" from the end, back stitch and remove from the machine. At this corner you will probably need to join the other strip. Although your strip may be long enough to go around the corner, it probably isn't long enough to make it to the next corner, so we will put our seam here where it will never show.
Draw your 3 marks at the 1/2", 1", and 1 1/2" again. And again, draw your "V". Trim the strip about 1/4" past the point of the "V". Seam your next strip to this strip using a 1/4" seam allowance.
Stitch your "V", trim the seam allowance to 1/8". Turn the corner and continue on like this around all 4 corners.
Once you have sewn your strips around all 4 edges, trim the seam allowance along the "V" to 1/8" also.

Turn the strip right side out, pushing the points of those "V"s out to make a nice sharp point.

Press the corners flat along your pillow edge. You will begin to see the mitered edge taking shape.

I had to trim my seam allowance around my pillow to 3/8" because my fabrics had so much bulk that folding this mitered flange to the back was getting too bulky.
On the back side of your pillow, turn under 1/2" along the remaining strip edge and pin all along your pillow.
Hand stitch this edge to the pillow back, making sure your stitches do not show on the front.

Stuff your pillow with a pillow fill and you are finished!!!

What do you think? Not so hard huh?!
The most challenging part about this pillow is the mitered flange and even that wasn't so hard once it is broken up into steps.

What do I think? I think PB who? Your pillow looks AMAZING. I am REALLY impressed. It's like a 3 in one tutorial (piping, zipper and coral design)...Flawless job!
ReplyDeleteamy @ whilewearingheels.blogspot.com
Amy,
DeleteFirst off, I have to tell you that I love the name of your blog.."While Wearing Heels"
Thanks so much for the kind words and I'm glad my tutorial was clear enough to follow, it's hard explaining this stuff sometimes. As soon as I'm done answering comments here, I plan to head straight to your blog to follow!
Jules
WOW! You (and your son!) did a great job replicating the Pottery Barn pillow. It looks just like the original! But better, because you made it all by hand :-)
ReplyDeleteKelly
Thanks! My son was so proud of himself! He really is a talented artist by nature. Glad you liked it!
DeleteJules
That's such an easy way to hide a zipper, I never would have thought of that! And the pillow looks fabulous! -Jessica@GreenPB&Js
ReplyDeleteJessica,
DeleteI'm so glad you liked it and I'm glad I could show you a new way of doing zippers! It's easy too!
Thanks Again, Jules
Love this great pillow, thanks for all of the pointers!
ReplyDeleteDonene, Your Welcome!
DeleteJules
How cleaver is this. I love it and would love if you showed it off on my link party.
ReplyDeletekampenlane.com
~Taylor
Taylor, Glad you liked it, I will definitely stop by your party!
DeleteJules
That is so neat.
ReplyDeleteNice tutorial. I've been sewing a long time, and I learned from it, so thank you! I've been wanting one (or two!) of those coral design pillows.
ReplyDeleteWow - very clever and the pillow turned out great!
ReplyDeleteLove your pillow! It makes me want to go to the fabric store tonight and make one.
ReplyDeleteSuch a gorgeous pillow! And your son did a great job with the coral!
ReplyDeleteSuper Cute!!!!
ReplyDeleteThis turned out amazing! I would love for you to link it up to my "I Made This" party at Grits & Giggles. http://www.gritsandgiggles.blogspot.com/2012/04/i-made-this_18.html
ReplyDeleteJenilyn,
DeleteThanks! I've recently started linking to your party, thanks for hosting!
Jules
this pillow is just so great, how it turned out.
ReplyDeleteIt's a dead ringer!!! What a great idea and you executed it beautifully!
ReplyDeleteThis is just so amazing. I would have taken one look at the PB pillow and sighed helplessly unable to afford it. I can't believe you actually MADE ON! I mean seriously- all of that coral was one big undertaking. You are so awesome and it turned out beautifully.
ReplyDeleteYou are so smart! I have seen that pillow in PB, too, and loved it, but never thought of making one for myself. It looks amazing. I'm pinning this for the zipper tutorial, too, because I have a zipper phobia when it comes to sewing--you wouldn't believe the lengths I go to to avoid them!
ReplyDeleteRuth,
DeleteThanks for pinning it! I'm so glad the zipper part helped with your zipper phobia! Zippers can be so easy once you know the tricks of the trade. I hope I have inspired you to master zippers and conquer your phobia!!
Jules
Beautiful job...the pillow looks great!!!
ReplyDeleteamazing...i love it
ReplyDeletebythewayjenngray.blogspot.com
Are you serious...this is amazing. Talk about talent. WOW!!!!! What an inspiring post! I would love it if you would share this post at our WIW linky party. I hope you can join us.
ReplyDeletePaula
Paula, Thanks so much!! I'll head over and start linking to your party! Thanks for the invite!!
DeleteJules
Whoa! This is awesome. I was wondering how you were going to pull this knock off- off!
ReplyDeleteI'd Love for you to come share it in The Mommy Club and or any of your other fun ideas! I saw this on Kitchen Fun With My 3 Son!
http://www.crystalandcomp.com/2012/04/the-mommy-club-share-your-resources-and-solutions-40/
Have a great weekend! Crystal
Crystal, Thanks for the invite and I'll be joining the party!
DeleteJules
That is incredible! It looks just beautiful and I'm so impressed. Every week you wow us with your talent and creativity and we are so glad you share it with us at Inspiration Friday!
ReplyDeleteVanessa
Thanks you so much Vanessa!!
DeleteJules
I absolutely love this! Your are awesome!
ReplyDeleteHow pretty! So glad you linked to Things I've Done Thursday!
ReplyDeleteBeautiful!! You and your son are very talented. This is my first time visiting your blog and I am now following.
ReplyDeleteSherry,
DeleteMy son is very talented and he's never had an art class! Glad you liked it!
Thanks for following,
Jules
Your pillow turned out beautiful! That's so nice of your son to help you out drawing the coral. I think your version is better than the original. Thanks for sharing!
ReplyDeleteYou amaze me! This looks every bit as beautiful as the PB one and at a much better price. Thanks for sharing at this week's BFF Open House.
ReplyDeleteholy moly, that is beautiful! i need to get my hands on a sewing machine!!
ReplyDeleteI like your even better! So cute!!!
ReplyDeleteThis is so stunning, the contrast in colors makes it pop! I'm a new follower!
ReplyDeleteShannon@SewSweetCottage
Shannon,
DeleteThanks! And thanks for following!1
Jules
Wow, just... wow. You have mad skillz! This is amazing!
ReplyDeleteThanks for sharing it on Show Off Saturday!
XO
Meg, Thanks for the vote of confidence! Glad you enjoyed it.
DeleteJules
I've featured your pillow today at Grits & Giggles! Come grab a featured button!
ReplyDeleteJenilyn,
DeleteThanks sooo much for featuring my pillow!! Love your blog and your link party!!
Jules
Just wanted to let you know I featured this as part of my link party wrap up ! Feel free to grab a featured button from my sidebar if you like and thanks for linking up!
ReplyDeleteCarol, Thank you so much for featuring my pillow, I'm so honored to be featured!! Proudly posting your featured button on my blog.
DeleteJules
Wonderful DIY! Thank you for sharing!! It is so pretty!
ReplyDeleteThis is FANTASTIC!!! Absolutely beautiful, thanks for the detailed tutorial - I love that Pottery Barn pillow too and this looks like a really fun project, I love making pillows!
ReplyDeleteBeautiful! And, props to your son for doing such a great job drawing the coral!
ReplyDeleteI love this pillow and your tutorial was great. My sewing projects are a little more on the basic side, primarily due to my lack of attention span. Check out My Home Tour when you get a chance to see the projects I recently completed. Cheers, MGal
ReplyDeleteThanks! Glad to hear you sew, even if it's just basic stuff! I bet you have fun when you do sew. I'm looking forward to checking out your home tour.
DeleteJules
This looks awesome! I wish I had your sewing skills! :)
ReplyDeleteThat looks awesome, good on your son drawing the coral it looks amazing. xx
ReplyDeleteGreat job! I might have to try this for my mother. She is obsessed with red coral! Thanks for sharing!
ReplyDeleteI can't get over this pillow! It's amazing! I've featured your tutorial on Sew Woodsy today! Thanks again for linking up!
ReplyDeleteKatie, Thank you so much for featuring my pillow, it means a lot!! Linked up to your party again this morning and I can't wait to see what everybody has done.
DeleteJules
This is incredible! I can't believe you made that wow. You put PB to shame!
ReplyDeleteWOW WOW WOW!! I just love this so pretty! I don't know that I could have a steady enough hand. You and your son did a wonderful job, better then PB! I will be featuring it next week but pinning for now :)
ReplyDeleteXO
Kristin
Kristin,
DeleteThanks for pinning it!! And thank you so much for featuring it!!! I really appreciate it!!
Jules
Hi I too flipped when I saw this pillow, however I wanted in in a light green, so decided to trace the pattern from the PB photo and i'm going to punchneedle in the coral with light green heavy floss! LOVE yours thanks for the tutorial
ReplyDeleteI bet that will come out nice. I'd love to see a picture of the finished pillow!
DeleteJules
I'm just sitting here with my jaw on the floor. Literally. Seriously! From the drawing your son made to the zipper tutorial to the custom trim ...
ReplyDeleteI bow to the master!
:)
Linda
Linda, That is so kind of you to say!! My son did do a great job with the coral, I'm not sure I could have done it without him. I learned from an even greater Master who puts my sewing to shame at times. She has been my mentor and friend for many years now and I owe so much to her for passing along her sewing knowledge to me, so I pay it forward through my blog.
DeleteJules
What a great project! And it really looks a lot like the original. Thanks for linking up with me for Friday Favorites. I'm featuring you this week!
ReplyDeleteJerri,
DeleteThanks for featuring my pillow, it means so much to me! Thanks for hosting every week.
Jules
Absolutely amazing - your sewing skills blow me away! Thank you so much for linking up your project. Just to let you know, you’re on the Inspiration Board spotlight today. Feel free to grab a featured button. Have a wonderful weekend.
ReplyDeletehttp://carolynshomework.blogspot.com/2012/04/inspiration-board-link-party-spotlight_27.html
Carolyn, Awe chucks, that is so sweet of you to say! I so appreciate you featuring my pillow and thanks for hosting a great link party every week!
DeleteJules
You sure don't have to worry about PB, they have to worry about you! So very pretty, and very well done. You are a really good seamstress. I've been working on making French Pleated cafe curtains. I've spent over a week figuring the calculations since I am making by hand, not using pleaters tape. I almost sent you and email to see if you cold help me figure out, but then finally got it. Thanks for sharing your creative inspiration at Sunday's Best Par.tay!
ReplyDeleteCathy, Thanks!
DeletePleated curtains can be a challenge, but I'm sure they will come out awesome! I never use pleat tape either! There is a formula for figuring pleats, so let me know if you are still struggling with them and I will share it with you. Never hesitate to send me an e-mail for help on a sewing project, I'm happy to help!! I just love to see that people are sewing!!
Jules
Hi, I'm Jaime. I run a blog called The Dress-up Drawer and I was just passing through. Love your blog and this pillow is amazing!
ReplyDeleteI have a great giveaway going on right now for a personalized platter from The Southern Belle Boutique and just thought it might interest you. Thanks for letting me say hi!
http://thedressupdrawer.blogspot.com/2012/04/review-and-giveaway-southern-belle.html
Hi Jaime, I'll stop by soon!
DeleteJules
This is gorgeous! And you make me think that even I could do a mitred flange. Thanks for linking to Tout It Tuesday.
ReplyDeleteThanks for hosting!
DeleteThanks for linking up to the Tuesday To Do Party! Hope you'll come again this week! This month's Pretty Packages party is now up for any of your lovely wrapped gifts!
ReplyDeletehttp://blackberryvine.blogspot.com/2012/04/pretty-packages-party-14-highlights.html
Smiles!
Jami
www.blackberryvine.blogspot.com
Jami, Thanks for hosting every week!
DeleteJules
these are so beautiful! i love them!
ReplyDeleteI like you version much better! Thanks for linking up at The Kurtz Corner! I have featured you on this weeks link party! Come grab a featured button and link up. Can't wait to see what you made this week! :)
ReplyDeletehttp://www.thekurtzcorner.com/2012/04/tuesday-tutorials-link-party-no-34.html
Audra,
DeleteThanks for hosting your party every week and thank you sooo much for featuring my pillow. I proudly linked your feature button!
Jules
This is fantastic! Coming to you from Sew Blessed.
ReplyDeleteHey, you speak my language! Your pillow turned out great. If we were neighbors we'd sew up a storm! Glad I found you via Knock-Off Decor and I'm anxious to read more posts.
ReplyDeleteEllen
LOve this pillow and the instructions for the mitered flange edging. Any way you'd be willing to scan and post the pattern your son drew. I'm not as talented as he but I can sew and would love to recreate this pillow.
ReplyDeletePatti
I know everyone's already said this but, Wow!! Amazing work. Love your sons art work and your sewing. Looks way way better than the PB version. To be honest I clicked the PB photo in my email thinking it was the tutorial link and had to go back and click your photo to come here for the tutorial. Awesome work.
ReplyDelete2015-7-10 xiaozhengm
ReplyDeleteoakley sunglasses sale
ray ban sunglass
jordan shoes
borse gucci
prada handbags
hollister clothing
louis vuitton
cheap oakleys
jordan uk
chaussure louboutin
cheap beats headphones
prada outlet
michael kors outlet online
coach factory outlet
air force 1
ray ban sunglasses
soccer jerseys
ed hardy clothing
fitflops sale clearance
toms outlet
kate spade outlet online
coach factory outlet
ray ban sunglasses
michael kors
pandora charms 2015
ralph lauren
gucci
coach outlet store online
air max shoes
ralph lauren
cheap jordans for sale
ed hardy
kate spade uk
polo ralph lauren outlet
ralph lauren uk
cheap ray ban sunglasses
coach outlet
longchamp soldes
michael kors bags
sac longchamp
There's nothing cost-free in this world, but make sure that you Buy facebook reviews solitary from the genuine sources for profitable acceptance on the web.
ReplyDeletebuy facebook likes reviews
This comment has been removed by the author.
ReplyDeletesolid throw pillow covers
ReplyDeletefarmhouse pillows for couch
decorative pillow shams
floral pillow shams set of 2 standard size
accent pillow case baby decoration
Click here
ReplyDeleteClick here
Click here
Click here
Click here
Click here
adu sakong online
slot online
game slot
I was very impressed by this post, this site has always been pleasant news Thank you very much for such an interesting post, and I meet them more often then I visited this site.xo jacket
ReplyDeleteOur the purpose is to share the reviews about the latest Jackets,Coats and Vests also share the related Movies,Gaming, Casual,Faux Leather and Leather materials available Blade Runner 2049 Coat
ReplyDeleteI love to recommend you Where can crawl Exciting Products latest Jackets, Coats and Vests Click Here Rainbow Sunburst Jacket
ReplyDeleteThank you for another great post. I’ve a presentation next week, and I am on the search for such information.And you are working a great job who increasing my knowledge. Sons of Anarchy Vest
ReplyDeleteNice Blog !
ReplyDeleteHere We are Specialist in Manufacturing of Movies, Gaming, Casual, Faux Leather Jackets, Coats And Vests See. Ronda Rousey Jacket
Smm Panel
ReplyDeleteSMM PANEL
iş ilanları
İnstagram Takipçi Satın Al
hirdavatciburada.com
Www.beyazesyateknikservisi.com.tr
SERVİS
JETON HİLE
üsküdar bosch klima servisi
ReplyDeletetuzla vestel klima servisi
tuzla bosch klima servisi
tuzla arçelik klima servisi
ataşehir mitsubishi klima servisi
kadıköy vestel klima servisi
kadıköy arçelik klima servisi
beykoz arçelik klima servisi
üsküdar arçelik klima servisi
أهمية تركيب الكلايدينج على الواجهات الخاصة بالمباني، فالكلادينج هو عبارة عن طبقة من الألومونيون أو أى معدن آخر تركيب كلادينج واجهات يتم وضع هذه الطبقة على واجهة المنزل بغرض الحصول على مظهر جذاب للواجهة، نابع من لمعان وبريق طبقة الكلادينج الموجودة على الواجهة
ReplyDeleteWe decided to include a model painted in red; this is symbolic of us paying for peace with our blood, because the title on the T shirt was peace. Bio-acetate is also biodegradable. Frames are shipped with demonstration lenses which Golden Goose Sale must be replaced before use. I felt myself entering a new orbit outside the Collina Strada spring 2022 show in Brooklyn: A guest whooshed Amiri Sneakers past me in an orange mesh top, cascades of lilac ruffles, and platform teal sneakers, frills fanning out in the breeze. Burberry Eau de Parfum is an Alexander McQueen Sneakers intense Off White Shoes interpretation of the original Mr. But now that the season is over, what Vogue editors around the world can't stop talking about is the fashion. Australia has had its share of climate emergencies lately, from the wildfires of early 2020 to the recent floods. isn't a conceptual brand, it's a lifestyle brand, so its message has to be direct, she said. Cuyana is a womenswear brand that truly believes in quality over quantity. Montero ran into some of her model friends like Selena Forrest and Majesty Amare backstage, and then it was onto walk rehearsals. No matter the show, the model says she always allows the clothing to dictate her walk. I Off White x Nike always get the feeling from the clothes, Montero says. Discover the new Ultimate Glow Fluid Foundation: Burberrys luxurious serum foundation. A blend of skincare and make-up for a Travis Scott x Nike Shoes multidimensional, youthful glow - day or night. Formulated with a powerful blend of active skincare ingredients including hyaluronic acid and viola extracts, this youth-infusing formula plumps and smooths your skin with its eight-hour hydrating properties - for a visibly youthful complexion and ultimate radiance.
ReplyDeleteq1f50m0z32 v6k05l3v14 t1q85m1t00 d3v80f9x20 c2v46z0s59 c1t92h1c39
ReplyDeleteHere we provide jobs in Mumbai from Job vacancy result company . And we also provide jobs in different state. Thanks for commenting.
ReplyDeleteJobs in Mumbai
Jobs in Mumbai
Jobs in Mumbai
Jobs in Mumbai
شركة تنظيف
ReplyDeleteشركة تنظيف بالجبيل
Good content. You write beautiful things.
ReplyDeletemrbahis
sportsbet
hacklink
vbet
korsan taksi
hacklink
sportsbet
taksi
vbet
يعتبر الدكتور أحمد عبد السلام افضل دكتور تحويل مسار المعدة ومن أكثر الأطباء رواجًا في القاهرة لخبرته في الجراحة العامة وجراحات المناظير وجراحات السمنة لقد أجرى أكثر من 5000 عملية جراحية في مستشفيات مختلفة وهو معروف بمعرفته ومهاراته عندما يتعلق الأمر بعمليات تحويل مسار المعدة إنه ضليع في عملية تغيير هضم الطعام الذي تستلزمه عملية تحويل مسار المعدة ويقوم بعمل ممتاز في تثقيف المرضى حول الخطوات المتبعة.
ReplyDeleteGood text Write good content success. Thank you
ReplyDeletekibris bahis siteleri
tipobet
mobil ödeme bahis
slot siteleri
bonus veren siteler
betpark
poker siteleri
betmatik
Visit: rattan garden furniture
ReplyDeletesms onay
ReplyDeletetakipçi satın al
YPO
fear of god essentials hoodie
ReplyDeletecheap jordans
jordan 4
palm angels outlet
palm angels
jordan shoes
fear of god essentials
off white hoodie
goyard bags
bape clothing
اصلاح اجهزة منزلية و كهربائية
ReplyDeleteخدمات مايكروويف
خدمات اصلاح اجهزة الكترونية و كهربائية
ارقام اصلاح اجهزة كهربائية
مركز صيانة اجهزة منزلية و كهربائية
ارقام تصليح اجهزة الكترونية
اصلاح اجهزة منزلية و كهربائية
رقم اصلاح اجهزة كهربائية
خدمة اصلاح اجهزة كهربائية
manisa
ReplyDeletemaraş
mardin
marmaris
mersin
GUN1
başakşehir
ReplyDeletebeykoz
gölcük
kütahya
bandırma
WİN
https://saglamproxy.com
ReplyDeletemetin2 proxy
proxy satın al
knight online proxy
mobil proxy satın al
RV2A
شركة تنظيف مساجد بالجبيل
ReplyDeleteتنظيف مساجد
Your web design is terrific. Hats off to your developer. Christmas Outfits
ReplyDeleteYour thoughtful approach to each topic is genuinely appreciated. Your blog has become a favorite source of inspiration for me.
ReplyDeleteYellowstone Shearling Collar Brown Wool Coat
<a href="https://methaly-union.com/%D8%B4%D8%B1%D9%83%D8%A9-%D8%AA%D9%86%D8%B8%D9%8A%D9%81-%D8%A7%D9%81%D8%B1%D8%A7%D9%86-%D
ReplyDeleteUSA Jacket Store has a great collection of jackets that make it easy to replicate your favorite celebrity’s look.
ReplyDeleteUSA Jacket Store
شركة تسليك مجاري بالاحساء tFp2xopdLP
ReplyDeleteI love the podcasts available on this site.
ReplyDeleteشركة عزل اسطح بالدمام rdjlchy8xt
ReplyDeleteشركة مكافحة حشرات بالمذنب
ReplyDeleteHyuZi5j0Rq
best music therapy certification online
ReplyDeleteCertification in Music therapy
From beginner to professional – Master music therapy at your own pace!
Ready to Become Music Therapy Practitioner
Learn how to treat 100+ conditions
Learn from experts & unlock the secrets of music for emotional well-being!
Buy now for ₹799 - Master Music Therapy Technique
Certification in Music therapy
ReplyDeleteFrom beginner to professional – Master music therapy at your own pace!
Ready to Become Music Therapy Practitioner
Learn how to treat 100+ conditions
Learn from experts & unlock the secrets of music for emotional well-being!
Buy now for ₹799 - Master Music Therapy Technique
Elevate Your Practice: E-Physioneeds Physio Academy
ReplyDeleteReady to elevate your physiotherapy practice to new heights? E-Physioneeds Physio Academy offers the cutting-edge education and specialized skills you need to stand out in today's dynamic healthcare landscape. Founded by the visionary Dr. Chakshu Bansal, a triple world record holder and renowned physiotherapist, and the esteemed Prof. Krishna N. Sharma, the world's youngest Vice-Chancellor and a multi-world record holder, E-Physioneeds brings you an unparalleled learning experience.
Why Choose E-Physioneeds to Elevate Your Practice?
Master Advanced, Evidence-Based Techniques: Go beyond the basics with our specialized courses featuring revolutionary approaches like Dr. Bansal's "Tapedia" (an extensive encyclopedia on certified taping) and Prof. Sharma's "KKMT" (Kinetic Manual Therapy), a 3D mobilization technique. From Dry Needling Certification to advanced Manual Therapy (ART, IASTM, MET), Sports Physiotherapy, Neurological Rehabilitation, and Pediatric Physiotherapy, our curriculum is designed to equip you with the most effective, in-demand skills.
Learn from Industry Pioneers: Benefit directly from the expertise of our founders and other top-tier national and international faculty. Their combined clinical insights and academic excellence ensure you receive an education that is both profound and immediately applicable, helping you confidently tackle complex cases.
Gain International Recognition: Our courses are internationally accredited by IAOTH (UK) and ISSA (USA), providing you with credentials that are recognized and respected worldwide. This global validation not only enhances your professional credibility but also opens doors to new career opportunities, allowing you to elevate your practice on a global scale. Many certifications include a premium printed certificate with a security hologram and global online verification.
Flexible Online Learning for Busy Professionals: We understand the demands of a busy practice. Our 24/7 accessible online platform offers high-definition pre-recorded lectures, detailed clinical demonstrations, and interactive quizzes. This flexibility allows you to learn at your own pace, fitting advanced education seamlessly into your schedule without disrupting your current commitments.
Practical, Results-Oriented Approach: E-Physioneeds focuses on practical mastery. Our courses emphasize a "hands-on approach" and are "result-oriented," meaning you'll gain actionable skills you can apply immediately in your clinic. This direct application translates to better patient outcomes and a more confident, effective practice.
Continuous Support and Community: Your journey to elevated practice is supported every step of the way. Benefit from continuous expert guidance via dedicated Telegram and WhatsApp groups, vibrant community forums, and direct Q&A sessions with instructors, fostering a collaborative environment for growth.
Soft Tissue Manual Therapy Training
ReplyDeleteOur Soft Tissue Manual Therapy Training teaches practical methods to address soft tissue dysfunction and support patient healing and performance.
Musculoskeletal Fellowship For Physiotherapists
ReplyDeleteThis Musculoskeletal Fellowship for Physiotherapists is crafted to elevate clinical reasoning, manual therapy, and evidence-based practice in MSK care.
Learn effective biomechanical taping methods to improve joint alignment, correct posture, and support rehabilitation in both clinical and athletic settings.
ReplyDeleteStudy effective taping methods for musculoskeletal conditions, including strategies to relieve pain, support injured tissues, and restore functional movement.
ReplyDeleteLearn effective biomechanical taping for rehabilitation to improve joint alignment, correct posture, and support rehabilitation in both clinical and athletic settings.
ReplyDeleteOur program in sports taping techniques targeted techniques to reduce injury risk, improve biomechanics, and support active muscle recovery.
ReplyDeleteStudy effective sports taping for performance enhancement, including strategies to relieve pain, support injured tissues, and restore functional movement.
ReplyDelete"Looking to advance your career with a Myofascial Release Certification? Our comprehensive program is designed for physiotherapists, chiropractors, massage therapists, and other healthcare professionals who want to master myofascial release techniques for effective pain management and rehabilitation. This certification course covers essential fascial therapy training, hands-on practice, and evidence-based approaches to improve mobility, reduce musculoskeletal pain, and enhance patient outcomes. Whether you’re seeking an online myofascial release course or in-person workshops, our training offers flexible learning with internationally recognized certification. Gain expertise in myofascial release for therapists, learn to integrate manual therapy into clinical practice, and stand out with the best myofascial release certification online. Perfect for professionals looking to expand their skills, this course provides practical knowledge, detailed anatomical insights, and advanced techniques to address fascial restrictions. Start your journey today with our trusted myofascial release certification program and elevate your practice with specialized fascial therapy training.
ReplyDeleteniiekd95p4
ReplyDeletegolden goose outlet
golden goose outlet
golden goose outlet
golden goose outlet
supreme outlet
golden goose outlet
golden goose outlet
golden goose outlet
golden goose outlet
golden goose outlet
Soft Tissue Manual Therapy Training
ReplyDeleteJoin our expert-led Soft Tissue Manual Therapy Training and learn evidence-based approaches to assess, treat, and relieve myofascial restrictions.
Soft Tissue Therapy Course For Occupational Therapists
ReplyDeleteEnroll in the Soft Tissue Therapy Course For Occupational Therapists to improve upper extremity rehab, hand therapy, and soft tissue recovery.
Dry Needling Training
ReplyDeleteAdvance your skills with Dry Needling Training designed for health professionals. Hands-on practice and expert instruction to boost your clinical expertise.
Dry Needling Course with CEU Credits
ReplyDeleteJoin a dry needling course with CEU credits. Gain skills, earn CEUs, and boost your professional value with accredited online dry needling training.
Taping Techniques For Therapists
ReplyDeleteDiscover essential Taping Techniques For Therapists to manage injuries, reduce pain, and improve mobility using kinesiology and therapeutic taping.
Myofascial Trigger Point Training
ReplyDeleteAdvance your manual therapy with Myofascial Trigger Point Training. Master techniques to release tension and improve patient outcomes effectively.
Find Rajasthan’s most trusted jacuzzi bathtub manufacturers offering premium spa bathtubs with strong build, modern styling, and advanced water-jet technology. Our exclusive range of jacuzzi bathtubs in Rajasthan is designed to deliver maximum comfort and luxury. As a well-known jacuzzi bathtub manufacturer in India and a respected jacuzzi bathtub manufacturer in Delhi, we provide high-quality bathtub solutions across India. Recognized among leading bathtub manufacturers in Delhi and established bathtub manufacturers in India, our brand focuses on innovation, reliable performance, and stunning aesthetics. With years of experience as jacuzzi manufacturers in India and top jacuzzi manufacturers in Delhi, we offer durable acrylic jacuzzi tubs suitable for all bathroom sizes. Whether you need a compact tub, a luxury spa model, or a hotel-grade jacuzzi, our Rajasthan collection ensures premium comfort and long-lasting value.
ReplyDeleteNice articles and your information valuable and good articles thanks for the sharing information Multi-Purpose Cushions
ReplyDeleteUpgrade your home with a stylish Jacuzzi Bathtub designed for comfort and luxury. As trusted jacuzzi manufacturers, we offer jacuzzi bathtub 2 person, affordable 2 seater jacuzzi bathtub, and corner jacuzzi Corner Bathtub options. Our range includes freestanding jacuzzi bathtub, deep soaking bathtub, and luxury bathtub with shower combo styles crafted with best quality jacuzzi bathtub materials.
ReplyDeleteDiscover the perfect jacuzzi bathtub for bathroom with our premium and affordable range. We are among the best jacuzzi bathtub manufacturer offering luxury jacuzzi bathtub for home, including Luxury acrylic jacuzzi bathtub 2 persons, jacuzzi bathtub 2 person, and affordable 2 seater jacuzzi bathtub options.
ReplyDeleteOur range includes corner jacuzzi Corner Bathtub, freestanding jacuzzi bathtub, and deep soaking bathtub styles. We also offer Ceramic Jacuzzi Bathtub, Acrylic Bathtub, and Ceramic Bathtub manufacturer solutions made with best quality jacuzzi bathtub materials. As a trusted acrylic jacuzzi bathtub manufacturer in Delhi, we provide premium jacuzzi bathtub, good quality jacuzzi tubs, and jacuzzi modern bathtub design. Discover all type jacuzzi bathtub and all size jacuzzi bathtub options.
when it comes to hosting research presentations or academic events, Party Rental Mississauga by Meadowvale Party Rentals – Canada’s best party rental can help provide a professional and well-organized setup.
ReplyDelete