I was making a pillow and I wanted a large natural looking button to attach to the front of it and I didn't want to spend the time or money to drive around searching for one. So I made my own and I was very pleased with it.
Pretty cool huh? That would have easily cost me $3.00 plus the time and gas to drive from store to store.
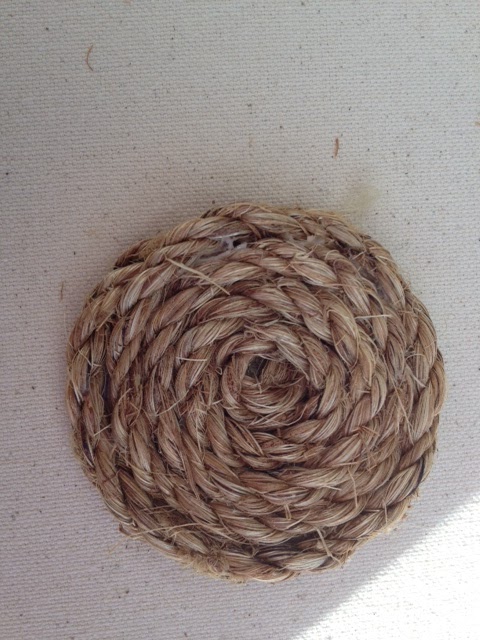
I made mine 2 3/4" diameter. First I cut 2 circles out of chipboard.
I used a little tacky glue to glue them together because one piece would not be sturdy enough.
I used some clothes pins to hold them together until they dried.
Next I found the center and made 2 small holes with a pin for me to stitch through.
Using tacky glue I started at the center tucking my starting raw edge under and began to glue the rope around and around. When I got to the end, I simply lifted up some of the rope and tucked my raw edge under and glued it really well.
Clip it again with clothes pins until it dries and there ya go...rope button that cost me nothing but about 20 minutes of glue drying time. Now my imagination is going wild. I'm thinking for my next button I will use shells or beads. What will you make your own buttons out of?
Here's how it looks on the front of my pillow.
Pin It


great idea .. love it!
ReplyDeletenew follower..cheryl x
That is just fabulous. Very original, I've never seen one like it and such a great idea. Thanks for your lovely comments. I'm following you now and would love it if you would do the same.
ReplyDeleteCarolyn xx
I absolutely love this! This is better than anything you could find in the store and now you have some new blog followers, including me. I'm also going to feature you this week on my top ten fav picks. Thanks for posting this! Mary :O)
ReplyDeleteCarolyn, I am so glad you liked my Rope Button! I just swung by your blog and I loved it at first sight! I'm now a happy follower!
ReplyDeleteThanks for your comment, Jules
Cheryl, I've been following your blog for a few weeks and I think I responded to your comment via email, but I'm still learning my way around the computer and blogging. so if you didn't get my response via email, please let me know so I know not to respond that way anymore. I love your site and all the beach theme posts!! I'm a summer/beach lover! Honored to have you as a follower and I look forward to sharing in the future!
ReplyDeleteJules
Mary, I've also been following you for a couple of weeks now, and I love your blog! Glad you liked the Rope Button! I can't wait to make more buttons with shells and other stuff I love.
ReplyDeleteAwe, I'm honored that you want to feature my button in your top ten favs!! Thank You so much! I'll look forward to it!
Thanks again, Jules
This is a great idea. I love the look and the price even more considering how expensive buttons can be! I'm a new follower!
ReplyDeleteHeather, Glad you liked my Rope Button! Not only did it save me money, but it saved me a lot of time running around trying to find a button that size. Glad to have you as a new follower.
ReplyDeleteJules
It is amazing the things I come up with because I don't want to run another errand! Genius!
ReplyDeleteThanks Laurel!
ReplyDeleteThanks for the tutorial. I'm going to try this with paper twine
ReplyDeleteHi Sandy, I would love to see a picture of the button you make with paper twine. Sounds like a neat idea!!
ReplyDeleteJules
very creative, I just made some glass coasters using the same method...:)
ReplyDeleteI am partying right after you at Nifty Thrifty Tuesday. I love this idea of yours and great tutorial. Thanks.
ReplyDeletegucci borse
ReplyDeleteugg outlet
oakley sunglasses wholesale
adidas superstar
ralph lauren
ray-ban sunglasses
pandora
michael kors
ugg sale
hermes belt
pandora bracelets
belstaff
prada
adidas originals
michael kors outlet online
rolex replica watches
hollister co
longchamp pas cher
true religion jeans
jordan pas cher
adidas original trainers
canada goose uk
barbour uk
mulberry handbags
sac longchamp pliage
ghd hair straighteners
retro jordans
cheap ray ban sunglasses
toms shoes
prada outlet
oakley sunglasses
nike elite socks
kevin durant shoes
2015915yuanyuan