Showing posts with label Buttons. Show all posts

Sunday, January 15, 2012

Kick Pleat Valances

Kick Pleat valances are a great way to top any window.  They've got crisp clean lines that can be played down with a simple solid fabric or spiced up with a bright colored patterned fabric.  Custom details can also be added to give them character.  Here's a few I've made for clients in the past.

This is an example of a basic, clean line kick pleat valance.  The pattern of the fabric almost acts like a solid and tops these basic drapery panels to give them a finished look.


Now here's an example of how fabric and contrast banding can make these anything but boring! 

Then there's this one that is completely customized with a scallop in the middle and a fan fold ruffle adorning the bottom and top edges. 

Here's the one I'm featuring in todays tutorial.
Isn't she adorable!  The fabric alone gives it a lot of interest, but then Mother of Pearl buttons were added to the top of each kick pleat to add a little whimsy.

There's a few things to consider when making a kick pleat valance.  After measuring the width of your window you must decide on the sections.  Odd number is always best.  You also have to decide on the length of the valance.  You may not want it to obstruct your view out the window, in which case it can be hung several inches above the window.  Once you have figured out the number of sections you want, you have to decide on fabric and motifs.  This ones motif did not fit within the space of the sections however, the pattern worked regardless.  If you choose a large patterned fabric to use on a small valance, just keep in mind what part and how much of the motif is actually going to show. 

Since there's so much going on behind the scenes of a kick pleat valance and we don't want there to be shading when sunlight shines through, we always use blackout lining on these.  In fact as a rule most valance styles are always lined with black out lining.  The good thing is kick pleat valances require minimal amounts of lining.

The finished size of this valance is 26" wide x 13" long.  We decided to have 3 sections and 4 pleats and it will be mounted on a 1x2 (which nets a size of 1 1/2")

What you'll need:  Fabric, blackout lining, thread, board and buttons.

Lets do the math to figure the length of our cuts.
I always make sure the face fabric wraps around the bottom towards the back of the valance by 2", so our cuts will include that.
1 1/2"(depth of board)+13"(finished length of valance)+2"(towards the back)+ 1/2"(seam allowance)=17" (length of each cut)

If you've never worked with blackout lining, it has a rubber-like coating that blocks out all light.  That rubberized coating also makes it kind of thick and it doesn't crease very well when pressed.  It also doesn't unravel or Frey like regular fabrics do.  Because of these factors, I construct things a little differently when I'm using blackout lining. 

To figure the length of the blackout lining cuts, here's the math.
1 1/2"(board depth)+ 13"(finished length of valance)=14 1/2" 
There's no seam allowance added into the blackout lining math because of the way I construct this valance.  The lining gets butted up against the inside of the hem fold line of the face fabric.  I'll try to explain in this illustration.
Now that we have the length of our cuts determined, we have to figure the width of each cut.  The width of the cuts will be completely determined by the number of sections in the valance and the fabric used for the valance.
My valance has 3 sections with 2 kick pleats separating the 3 sections and 2 half kick pleats at the ends of the board.  Take the finished width of your valance (26) divided by number of sections(3)= width of sections.  Since mine came out uneven, my sections will be 8 3/4, 8 1/2, 8 3/4.  The 1/4" difference will never be noticeable.
Our kick pleats are going to be 3" deep.  You can make them as small as 2" if necessary, but I wouldn't go any smaller than that because you need that fullness in there for the valance to lay smoothly.

If you've chosen a solid fabric for your valance your cut widths will be much easier to figure.  If you've chosen a patterned fabric then you will have to figure your cuts around centering your motif in the center of each section.

Lets look at the workings of the valance first to help you understand what factors come into play.
More than likely you will have to use more than one cut of fabric for this valance.  You will definitely have more than one cut if you are using a fabric with a large motif to be centered in the middle of each section.  So lets look at where the seams are to be placed.
My Motifs landed on the fabric in such a way that I had to cut a piece for each section.  My cut for the first section on the left side of the valance was 26 1/4" wide x 17" long.  Here's how I got my cut size.
1/2"(seam allow)+1 1/2"(return for board depth)+3"+3"(half a kick pleat)+8 3/4"(left front section)+3"+3"+3"(3/4 of my kick pleat at which point I need to make a seam)+1/2"(seam allow)=26 1/4".  Here's visual if you are having a hard time understanding the cut.  It also shows where your motif should be centered.  Please excuse my drawing, I'm not very good at Microsoft Paint yet and there is a lot to explain in this drawing.  I tried to make it as simple as possible, but as I said, there is a lot to explain in this one drawing.  You may need to take a few minutes to study the drawing to understand the full concept.  Once you have the "ah ha" moment, you will "get" it and it will make understanding the rest of the cuts much easier.

Whew!  That was a lot of information at once.  I usually draw all my cuts out on the fabric before I begin to cut just in case there needs to be any adjustments because of fabric shortage.  Now lets figure our 2nd cut, the center cut.

 Notice that my first cut was positioned on the right hand area of my fabric and the middle section is positioned in the middle area of my fabric.  This is where my motifs happened to land on my fabric.  The third cut had to be cut out of the same motif as section one except that motif was too close to the selvage edge of the fabric to be cut there.  Thank goodness that same motif was also positioned on the left side of my fabric.  Keep these kinds of things in mind when planning your valance.

You may have more then 3 sections in your valance, in other words you might have several center sections.  They will probably end up being the same width as the one we figured as our middle section, so you will just repeat that cut as many times as necessary to get all your sections cut.  I usually number mine starting from the left side of the valance so I don't confuse them when it's time to sew them together.  You don't want to accidentally sew them out of order.

You have officially finished the hardest part of this valance!  Give yourself a pat on the back if you are still with me here!
Now we need to cut our Blackout lining.  Here's how we figure the length to cut our Blackout lining.  13"(finished length of valance)+1 1/2"(board allowance)=14 1/2"
Our widths are going to be the same as our face fabric except in reverse order.  So I cut 3 pieces.  The first one 26 1/4" wide, the second one 21 1/2" wide and the third one 20 1/4".  The difference is I numbered them from right to left this time.  This ensures our seams will be in those kick pleats and that the Blackout lining seams will not land in the same place as the seams for our face fabric.  If they all landed in the same place, this would cause a lot of bulk, we want to spread out our bulk.

Finally we can get to the sewing part of this tutorial.  Stitch your face pieces together in the order they are numbered starting from the left side.  Stitch your Blackout lining pieces together in the order they are numbered starting from the right side.
Press all these seams open.  Try to get the Blackout lining seams as flat as possible.
With the right side of your Blackout lining facing up, draw a line along the bottom edge 1 1/2" from the bottom.  Use a pencil to do this.
With right sides together, pin the bottom edge of your valance to this line.
Stitch along this bottom edge 1/2" from the raw edge of the valance face.
Open the two pieces up and lay them face down on your pressing area and press the Blackout bottom edge towards the fabric.
With it laying just like it shown in the picture above, bring the top of the face fabric up to meet the top of the Blackout lining.

Press this bottom edge really well, this is the bottom edge of your valance.  Put pins along the top edge of the valance starting about 12" in from the sides.  Place the pins parallel with the top edge about 1" from the top edge.

Now we have to sew the side seams.  We need to fold the right sides together along the sides folding it over itself where we made that pressed crease.  It might be hard to get this to lay flat for sewing, so if you need to take a few pins out of the top to get it to lay flat, then do so.
Here's another picture of that step.  Pin both side edges.
Stitch along the sides using 1/2" seam allowance.
Clip the bottom corners as shown below.

Now turn those corners right side out again and give them a good pressing.  Re pin the top 1" from the top with pins parallel.  Serge this top edge or zig zag along the top edge to keep the layers together and to finish off that top edge.  It's OK if the 2 layers are not lined up exactly with each other.  Just serge along the outer of the 2 layers.

Our sewing is now complete!  Minimal sewing huh?! :-)
Now we need to cut our board.  I used a 1x2 which nets an actual size of 1 1/2"x3/4".  I get mine at my local Hardware store.  They don't have to be anything fancy because they are going to be covered with fabric.  But you DO want to try to get one that is as straight as possible.  Notice the really warped one in the right hand side of this picture.  Something like that would make our valance hang uneven.

My finished valance width is 26" so I cit my board to 26".

Cut a piece of scrap fabric.  I'm using a piece of regular white lining.  I don't recommend using the Blackout lining for this because it is so thick that it will add too much bulk.  Use a piece of your face fabric if necessary.  Cut your scrap piece 4" longer than your board and 5 1/2" wide.  Lay your board in the center of this scrap and pull one long edge up and over the board and staple all along the long edge approx. every 4" or so.
Now pull the other long edge up and over that and staple in the same manner.

Trim the excess lining from the fabric that is extending past your board like this.

Push the sides in slightly with your fingers and wrap this fabric up over your board and staple.  Trim off excess after stapling.

Before we can mount the valance to the board we must do 2 things: 1. draw our lines where the pleats will land.  2.  Pin in our pleats.

First draw a line with a pencil 1 1/2" in from each side of the board.  Now measure over from the edge of the board and draw a line where your first pleat will land.  In my case my first section is 8 3/4", so my line is drawn 8 3/4" from the side of the board.  My second section is 8 1/2" wide, so I drew a line 8 1/2" from the first sections line.  The remaining area should equal 8 3/4" for my third section.

Using a hem gauge, I pin in the pleats at the top of the valance.  Once I have them all pinned in correctly, I give the pleats a good pressing with my iron.  With your hem gauge, measure over 1 1/2" from each side and place a pin there to mark it.  Then form 3" deep half pleat.
Measure over from there the width of your section (in my case 8 3/4") and form a complete 3" pleat.  Pin.  Continue until you have all your pleats pinned in.  Lay your board above your valance and you should see the pleats lining up with the lines on your board.  There should also be 1 1/2" extending beyond each side of your board.  This is the return.  Wrap the return around to the sides of your board and staple them to the pencil line that is 1 1/2" from the edge.  Staple them diagonally like shown in this picture.

Pivot the rest of your valance to the front edge and bring it to the top of the board, it will stack on top of the return we already stapled to the board.
Staple at every edge of a pleat and 3-4" apart every where else.  Pull the pins out after you staple.  If you decided to add buttons to the top of your valance, this is when you would add them. 
Tada!!!  Your valance is done! :-)  Use a couple "L" brackets to hang it above your window.  Hang the "L" brackets first, then set your valance on top of the "L" brackets and screw from underside through the holes in the bracket right into the wood.  Step back and take a look at your finished valance.  Give yourself a HUGE pat on the back because I know these directions got a little complicated at times and you stuck with me and finished the valance.
As I said at the beginning of this tutorial, all kinds of Custom details can be added to Kick Pleat valances.  I'll do some tutorials on those another day....so follow me and stay tuned! Pin It

Monday, January 9, 2012

Easy Pillow with Rope Button

I'm changing pillows out around my house again.  I do this often!!  As my mood changes so do the pillows around my house.  For the last 2 weeks we've had spring like weather here in Southern California, yep in January we are in the 70's.  It has me thinking about summer and the beach and so it's time to make some summer inspired pillows.

This one is really easy.

  This pillow is 20"x20" when finished.
What you'll need: 1 yd of fabric, matching zipper, 20" pillow fill and a large button (or you could make this one) I've given the link on how to make this one towards the end of this post.

For the front you will need to cut 1 piece @ 21"x9"  for the top flap(1)
                                                  1 piece @ 21"x 16" for the bottom half(2)
                                                  1 piece @ 21"x2 1/4" for the facing(3)
                                                  1 piece @ 8"x1 1/2" for the button loop(4)
For the back you will need to cut 1 piece @ 22"x22"(5)

Press the loop piece(4) in fourths lengthwise, first by pressing in half.

Then press the long edges again up to the fold line.

Then fold at original pressing fold and pin.

Set this aside for a minute, since we're at the ironing table we might as well press the long edge of the facing(3) too.  Press 1/2" up on one of the long edges of the facing.

Now head on over to your sewing machine and top stitch the loop piece.
Find the center of the pillow top flap(1) and mark it with a pin.  With the right side up, fold your loop in half and pin it to the center of the top flap.  ( measure your loop against the button you will be using and adjust it smaller if you need to)  I adjusted mine by about an inch.
Using a 3/8" seam allowance, stitch back and forth over the loop to secure it.

Now with right sides together pin the unpressed edge of  your facing(3) to the lower edge of the top flap(1).
Stitch using a 1/2" seam allowance.
Press facing towards the wrong side of the top flap and pin.
Top stitch along folded edge of facing.  Try to stitch this as straight and nice as possible because this will show on the front of your pillow. 
Here's a sewing tip:  Use painters tape to put on your throat plate as a stitching guide when your stitching needs to be farther away from the edge.
Serge the top edge of your front bottom piece(2) and press under a 1/2" to the wrong side. Top stitch.
Lay your front pillow pieces out and with the top flap over the bottom front and until the height is 21". Pin.
Figure the placement of your button and hand sew it in place now. Directions for how to make the Rope Button I used can be found here:   DIY Large Rope Button

All you have left to do is insert a zipper and stitch up the top and sides.  You can find those steps here:
Basic Pillow Instructions

Happy pillow making! Pin It

Saturday, January 7, 2012

DIY Large Rope Button

I was making a pillow and I wanted a large natural looking button to attach to the front of it and I didn't want to spend the time or money to drive around searching for one.  So I made my own and I was very pleased with it.
Pretty cool huh?  That would have easily cost me $3.00 plus the time and gas to drive from store to store.

I made mine 2 3/4" diameter.  First I cut 2 circles out of chipboard.

I used a little tacky glue to glue them together because one piece would not be sturdy enough.

I used some clothes pins to hold them together until they dried.

Next I found the center and made 2 small holes with a pin for me to stitch through.
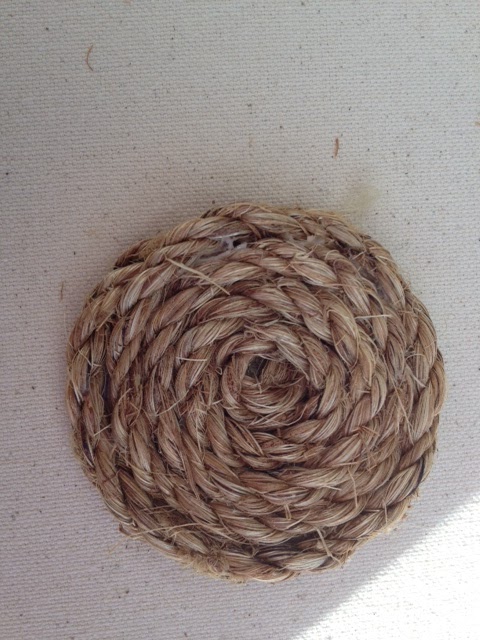
Using tacky glue I started at the center tucking my starting raw edge under and began to glue the rope around and around.  When I got to the end, I simply lifted up some of the rope and tucked my raw edge under and glued it really well.

Clip it again with clothes pins until it dries and there ya go...rope button that cost me nothing but about 20 minutes of glue drying time.  Now my imagination is going wild.  I'm thinking for my next button I will use shells or beads.  What will you make your own buttons out of?
Here's how it looks on the front of my pillow.
Pin It