Pillows are like accessories to a room. Because they are so easy to sew, I change mine out frequently. The whole color scheme of a room can be changed just by changing the pillows. I made a holiday one to use in this example.
When I say "Basic Pillow" I'm referring to just a square pillow with a zipper and no trim of any kind around the edges. In future posts I will show how to do more advanced pillow styles, but for now I wanted to start off with the basics. And yes, I said with a zipper! Zippers ARE easy and can be mastered by beginner sewers. If you have a zipper foot and can sew a straight line, then you can make this pillow!
For a 18"x18" square pillow, I cut 1 front 19"x19" and 1 back 20"x20" ( I always cut the backs of pillows 1" bigger than I cut the front) I'll explain why later. and then cut a zipper stop approx 9"x1 1/8".
I use my serger/overlock machine to finish off the bottom edges of the front and back. I do not serge all 4 sides of the pillow, just the bottoms so no frayed edges get caught in the zipper.

As a professional I use nylon zipper by the yard. Here's a great source for zipper by the yard.
<iframe src="http://rcm.amazon.com/e/cm?t=sewpass-20&o=1&p=8&l=as1&asins=B003JNZOGA&ref=tf_til&fc1=000000&IS2=1<1=_blank&m=amazon&lc1=0000FF&bc1=000000&bg1=FFFFFF&f=ifr" style="width:120px;height:240px;" scrolling="no" marginwidth="0" marginheight="0" frameborder="0"></iframe>
You can use a regular zipper, just purchase one that is the same size as your pillow (in this case 18") and you can still use this zipper method and you will not have to worry about sewing around the metal zipper stops.
 |
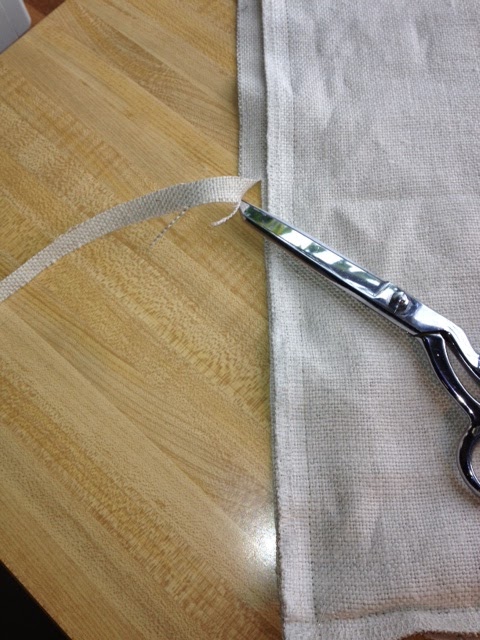
| Cut your fabric zipper stop in half so that you have 2 that are approx 4 1/2"x1 1/8". Cut the bottom of your zipper right above the zipper stop. Fold under 1/2" of the fabric zipper stop and lay it a 1/2"over the cut edge of your zipper. Stitch back and forth a couple times along the zipper teeth. |
Turn the zipper around and stitch back and forth against the teeth on the other side.
It should now look like this at the bottom of your zipper.
Lay your pillow back, bottom serged edge, right side down on top of your zipper aligning the edges. Stitch close to the zipper teeth that you can feel and see under your fabric.
Pause when you get approx 6" from the edge.
Fold under 1/2" of your other fabric zipper stop and lay it next to the unstitched zipper section.

Unzip your zipper so the zipper pull is above where the new fabric zipper stop aligns with the pillow. Trim the top of your zipper 1/2" beyond where the fabric zipper stop will connect.
Place the fabric zipper stop 1/2" beyond the top of your zipper, lay the remaining back pillow down and continue stitching to the end.
This is what your zipper should look like at this point.
Zipper Flap: Right side up, finger press fabric over the teeth of the zipper like shown above.
Top stitch along this edge. Depending on the width of your zipper foot, I stitch with the right side of my zipper foot against the left edge of the zipper teeth. This helps as a guide to stitch straight. When you get to the zipper pull, simply stop stitching with the needle down, unzip your zipper to move the zipper pull to where you have already top stitched and then continue top stitching.
Now it's time to join the front to the back of your pillow at the bottom zipper edge. With the pillow front right side up, lay your pillow back right side down along the bottom zipper edge. Extend the back 1/2" past the front (remember we cut the back 1" bigger than the front)
Making sure you have the zipper flap pushed back out of the way, stitch along the zipper teeth. You may end up with more then 1/2" extending past your pillow front at this edge, that's OK.
Now we just have to close up the other 3 sides of your pillow.
With the back of your pillow on the bottom facing up, push the zipper flap flat against the zipper. Lay the front pillow piece over the top (remember the front will be 1/2" smaller than the back on the 3 remaining sides.
Using the fronts raw edge as your guide and using a 1/2" seam allowance stitch this edge.
When you get to the end, stop 1/2" from the corners edge, put your needle down, lift presser foot, pivot and continue along the top edge now. Turn the next corner the same way.
Notice that as you come down this 3rd edge, the back piece may have more than 1/2" extending beyond the front, this is OK.
Push the zipper flap flat over the zipper teeth and stitch to the end, back stitching to secure the edge.
Trim off the extra 1/2" from the 3 edges you just stitched.
Clip the corners diagonally approx. 1/8" from stitching.
Dab with a very small drop of glue just to secure the corners. After the glue dries, turn the pillow right side out and give it a good pressing.
For this pillow I used a poly pillow insert. As you can see by the tag, I picked this one up at the local thrift store for $2.00. Thrift stores are a great place to find all kinds of sewing notions for pennies on the dollar.
I always cut the tags off the pillow fills, it just makes them nicer when you finish stuffing them.
Now for stuffing....Here's how us professionals stuff pillows and cushions.
With your right hand, give it a good karate chop.
Then with your left hand fold the pillow in half.
Keeping it folded like a taco, grab it with your right hand and slide it in your pillow cover.
I then usually add a little polyfil stuffing to the corners to fill them out a little. Close your zipper and you're done!
The reason we cut the back 1" bigger than the front was to allow for the extra fabric to be folded over for the zipper flap and to keep lining up the edges from being an issue. If you've ever sewn 2 squares that are the same size together, then you know that sometimes they won't line up perfectly around all 4 edges. The cause of this is technical, but I will try to explain. The pressure the machine foot tends to put on the top layer of fabric tends to stretch it out and the feed dogs that feed the bottom layer of fabric tend to gather them up (or shrink it) So by allowing extra fabric on the back piece, you don't have to worry about anything lining up. I promise your pillow will still come out appearing perfectly square.
I'm hoping these instructions aren't too confusing! That's why I included lots of pictures, if my wording is too hard, just follow the pictures. Happy Pillow Making!!
Pin It